Replacing a faulty spray nozzle is one of those small fixes that can make a big difference around your home. Whether it’s your kitchen faucet sprayer or an irrigation sprinkler head, an old clogged or leaky nozzle can cause all kinds of annoying problems.
Luckily, replacing a spray nozzle is a pretty straightforward DIY project. As long as you have the right replacement part and a few basic tools, it’s a repair anyone can handle in less than an hour.
In this guide, as a professional spray nozzles supplier, I’ll walk you through everything you need to know to replace common types of spray nozzles like a pro.
Why Replace Your Spray Nozzle?
Before jumping in, let’s quickly go over why you’d want to replace a nozzle in the first place. There are a few common issues that signal it’s time for a new spray nozzle:
Clogs
Mineral deposits from hard water or small bits of debris can clog up the tiny openings inside spray nozzles over time. This causes uneven spray patterns or reduced water flow. No amount of soaking or scrubbing will restore a badly clogged nozzle.
Wear and Tear
Constant water pressure and exposure to mineral deposits slowly erode the inside of metal and plastic nozzles. Old worn nozzles spray poorly and often leak.
Breaks
It’s easy to accidentally knock the slender arm of a sink sprayer or irrigation sprinkler, which can snap internal parts. Dropping a metal nozzle on a hard surface can also damage it.
Any nozzle with clogs, leaks, uneven spray patterns or physical damage needs to be replaced. Replacement nozzles are inexpensive, so it’s smarter to swap in a new one rather than struggle with an old worn-out part.
How to Replace a Sink Sprayer Nozzle
The first type of spray nozzle we’ll look at is the one found on most kitchen sink sprayer hoses. This style has a nozzle head that threads or snaps onto the end of the hose.
Replacing a faulty sink sprayer nozzle takes just a few minutes. Here’s how:
What You’ll Need
- Replacement nozzle (Match the connection type, diameter, flow rate and spray pattern)
- Basin wrench or tongue-and-groove pliers
- Pipe tape (optional)
Steps
- Turn off water supply valves under the sink
- Depress lever on sprayer handle to relieve pressure
- Disconnect spray hose and unthread nozzle head
- Clean mineral deposits off mounting nut threads
- Apply pipe tape to nozzle threads (prevents leaks)
- Thread new nozzle head onto spray hose by hand
- Finish tightening nozzle with pliers or basin wrench
- Turn water back on and check for leaks
Be sure not to over-tighten the nozzle or you could crack the plastic housing. The connection just needs to be snug enough not to leak.
Replacing a Pull-Out Sprayer Nozzle
Many modern kitchen faucets have a handy pull-out spray nozzle built right into the faucet spout. This makes rinsing dishes or cleaning the sink super convenient.
When these integrated spray nozzles go bad, replacing them is quick and easy:
What You’ll Need
Replacement pull-out nozzle
Needle nose pliers
Pipe tape (optional)
Steps
- Shut off water supply lines
- Retract the pull-out hose all the way and remove the weight clip
- Firmly pull down the spray head collar with pliers
- Unthread and remove the old nozzle
- Clean thread areas of new nozzle and apply pipe tape
- Thread on new nozzle head by hand
- Reinstall weight clip
- Turn water back on and check for leaks
On some models, you may need to depress locking tabs on the spray head collar with a screwdriver to detach the nozzle. Just be gentle not to scratch the finish.
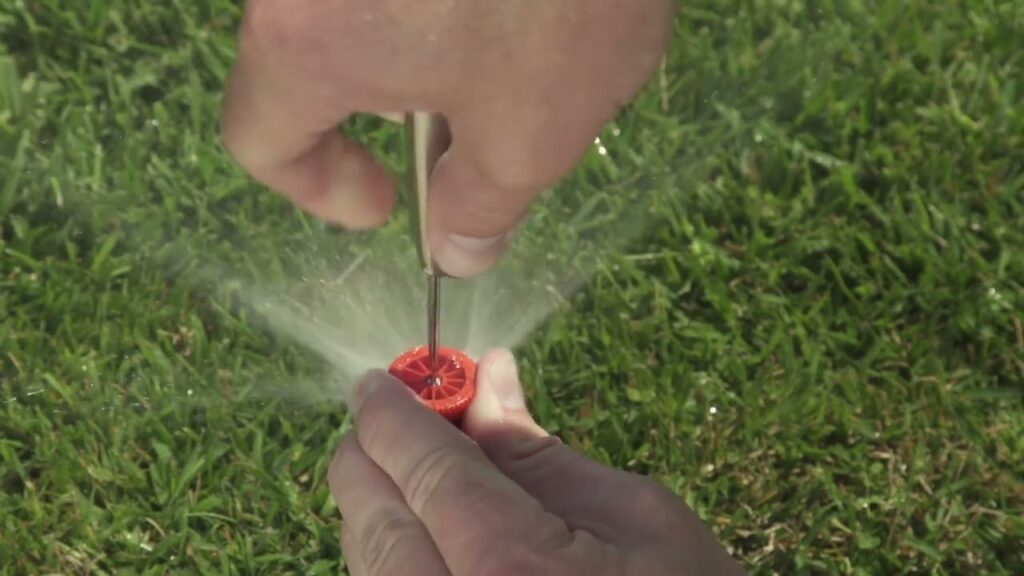
Replacing a Sprinkler System Spray Nozzle
Rotary and spray-type sprinkler heads have small nozzles that screw into the top of the head. These small plastic nozzles easily get clogged or damaged.
When flow is reduced or you see leaks, it’s probably time to swap in new nozzles. Here are the steps:
What You’ll Need
- Replacement spray nozzle (Match model, spray type, and radius)
- Small flat head screwdriver
- Needle nose pliers
Steps
- Shut zone valve and depressurize lines
- Use screwdriver to pop up sprinkler head
- Unscrew old nozzle with pliers
- Install replacement nozzle
- Adjust head to proper radius and arc
- Turn water on and visually inspect
Many sprinkler heads have interchangeable nozzles so you can adjust spray distance and patterns. Just be sure replacement parts match the head brand and model.
Fixing a Compressed Air Spray Gun Nozzle
Compressed air-powered detail spray guns have tiny nozzle openings that easily get blocked by debris in the air line. A clogged spray gun nozzle causes splattering and uneven spray.
Fixing a detail spray gun nozzle is fast and easy:
What You’ll Need
- Nozzle cleaning kit
- Pipe cleaners
- Needle files
- Spray nozzle socket
Steps
- Disconnect air hose and depress trigger to relieve pressure
- Unthread nozzle nut with nozzle socket
- Remove stuck nozzle using pliers if needed
- Soak nozzle in cleaning solution and gently scrub openings
- Rinse nozzle and use pipe cleaners to clear debris
- Air dry nozzle and inspect opening with magnifying glass
- Replace nozzle seal if worn and reinstall nozzle
Periodically soaking air nozzles prevents accumulated debris from hardening inside. Lightly filing away any burrs around nozzle openings also helps optimizing spray patterns.
Extend Your Nozzle’s Life
No matter what type of spray nozzle you replace, here are some tips to keep the new one working well for as long as possible:
- Always shut off water supply when not in use
- Install an inline water filter system
- Flush out nozzles regularly
- Avoid spraying abrasive cleaning products
- Handle nozzle gently when cleaning
Following this preventative maintenance goes a long way towards avoiding untimely nozzle failures down the road.
The Bottom Line
Replacing old clogged and leaky spray nozzles restores full coverage and pressure for cleaning tasks and irrigating your yard. As you can see, repairing most common nozzle types is a quick DIY project anyone can tackle in about 10 minutes with minimal tools.
Now that you know how to replace a spray nozzle like a professional, you can take care of minor plumbing and irrigation issues yourself without waiting around for expensive service calls.