Installing misting nozzles might seem like a daunting task at first glance. But here’s the thing: with the right approach, it’s actually pretty straightforward. As a professional produttore di ugelli di nebulizzazione, I’ve helped dozens of people set up their patio misting systems over the years, and the number one question I get is how to install misting nozzles properly without creating a leaky mess.
The good news? Once you understand the basics, you can have a professional-looking misting nozzle system up and running in just a few hours. And that’s exactly what I’m going to show you today.
Why Proper Nozzle Installation Matters
Let’s get one thing straight:
The difference between a misting system that creates a refreshing cool zone and one that just soaks everything in sight comes down to one thing: proper nozzle installation.
I learned this the hard way back in 2019 when I rushed through my first installation. The result? Water dripping everywhere and angry patio furniture.
Here’s what proper installation gets you:
- Ultra-fine mist that evaporates before hitting surfaces
- Even cooling coverage across your entire patio
- No leaks or drips (your furniture will thank you)
- Maximum efficiency from your misting pump
What You’ll Need Before Starting
Before we dive into the installation process, let’s talk tools and materials.
(Trust me, having everything ready beforehand will save you multiple trips to the hardware store.)
Essential Tools:
- Power drill with 1/8″ bit
- Tape measure
- Tubing cutter (or sharp utility knife)
- Adjustable wrench
- Marker or pencil
- Safety glasses
Materials:
- Misting nozzles (obviously)
- Tubing (flexible or rigid)
- Nozzle fittings (tees or elbows)
- Mounting brackets
- Teflon tape
- Water filter (seriously, don’t skip this)
Pro Tip: Buy 10-15% extra nozzles. They’re small and easy to lose, plus having spares means you won’t need to halt your project if one gets damaged.
How to Install Misting Nozzles: Step-by-Step Process
Now for the main event. Here’s exactly how to get those nozzles installed like a pro.
Step 1: Plan Your Misting Line Layout
Prima di tutto, le cose da fare:
You need to map out where your misting line will run. This isn’t the time to wing it.
Grab your tape measure and:
- Measure the perimeter where you’ll install the system
- Mark nozzle locations every 24 inches (for standard patio cooling)
- Identify where your water source connects
- Plan for corners and angles
I like to use painter’s tape to temporarily mark the path. It gives you a visual reference and is easy to adjust if needed.
Step 2: Mount Your Tubing
With your layout planned, it’s time to get that tubing up.
If you’re using flexible tubing:
- Start at your water source connection
- Work your way along your planned route
- Secure with mounting brackets every 2-3 feet
- Leave some slack at corners (trust me on this)
For rigid tubing or pipes:
- Cut sections to fit between mounting points
- Dry-fit everything first
- Use appropriate connectors at joints
- Apply Teflon tape to threaded connections
Here’s a mistake I see all the time: People pull the tubing too tight. Leave a little play in the line. Thermal expansion is real, and tight lines lead to stressed fittings.
Step 3: Install the Nozzle Fittings
This is where things get interesting.
Depending on your system type, you’ll either have:
Slip-lock fittings (most common with flexible tubing):
- Cut the tubing with a clean, straight cut
- Push the tubing firmly into the fitting
- You’ll feel it seat past the O-ring
- Give it a gentle tug to confirm it’s locked
Threaded fittings (common with rigid systems):
- Drill pilot holes where marked
- Tap threads if needed (or use self-tapping fittings)
- Wrap threads with Teflon tape
- Hand-tighten the fitting, then give it another 1/4 turn
Step 4: The Critical Flushing Step
Here’s where most DIYers mess up:
DO NOT install all your nozzles yet.
I know you’re excited to see that mist, but patience here saves headaches later.
Instead:
- Leave the last fitting in your line open (no nozzle)
- Connect your water supply
- Turn on the system
- Let water run for 60 seconds minimum
Why? This flushes out any debris, metal shavings, or plastic bits from cutting. These tiny particles will instantly clog your misting nozzles.
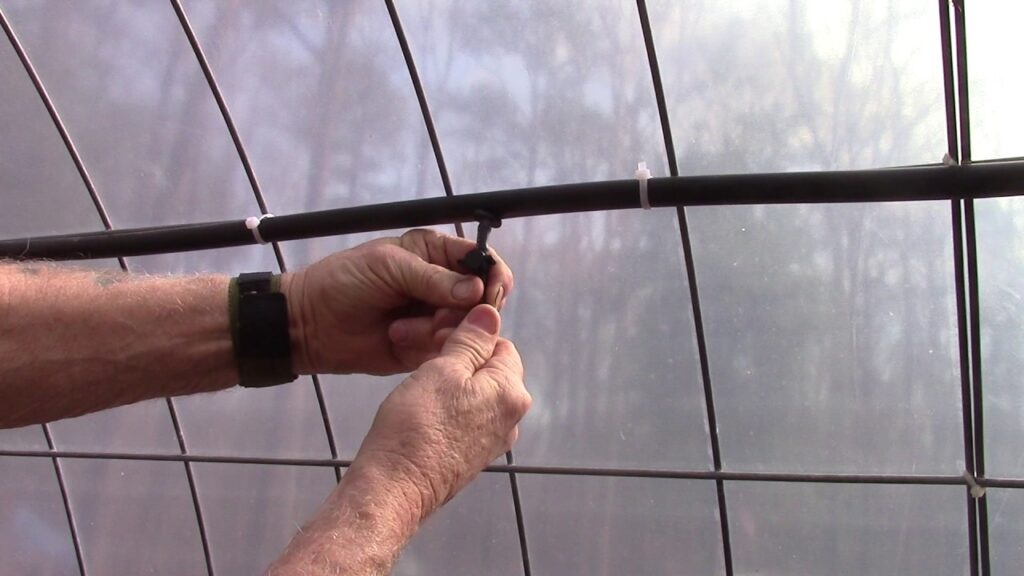
Step 5: Install the Misting Nozzles
Now for the satisfying part.
Take each nozzle and:
- Check the O-ring is seated properly
- Thread it into the fitting by hand
- Tighten until snug (but don’t overdo it)
- Orient the nozzle to spray outward
Critical point: Hand-tighten only. I’ve seen too many cracked nozzles from people getting wrench-happy. These aren’t lug nuts – gentle pressure is all you need.
Step 6: Install That Final Nozzle
Remember that last fitting we left open? Time to:
- Turn off the water
- Install your final nozzle
- Double-check all connections
Step 7: Test and Adjust
Fire up your system and check for:
- Leaks at fittings
- Proper mist pattern
- Even coverage
- Nozzle orientation
Walk through your cooling zone. You should feel an even temperature drop without getting wet.
Nozzle Spacing and Positioning Tips
Let me share what I’ve learned about optimal nozzle placement:
Standard spacing: 18-24 inches apart
- Closer for low-pressure systems
- Further apart for high-pressure setups
Height considerations:
- 8-10 feet is ideal for patios
- Higher placement = wider coverage
- Too low = wet guests
Direction matters:
- Angle nozzles slightly downward (about 15 degrees)
- Point away from electronics and furniture
- Consider prevailing wind direction
Common Installation Mistakes to Avoid
I’ve seen (and made) plenty of mistakes over the years. Here are the big ones:
Mistake #1: Skipping the Water Filter
Hard water minerals will clog nozzles faster than you can say “calcium buildup.” A simple inline filter extends nozzle life dramatically.
Mistake #2: Using the Wrong Nozzle Size
Nozzle orifice size matters:
- 0.008″ for high-pressure systems
- 0.012-0.016″ for mid-pressure
- 0.020″+ for low-pressure
Wrong size = poor performance or excessive water use.
Mistake #3: Over-tightening Everything
Misting components are typically brass or plastic. They don’t need gorilla strength. Over-tightening causes:
- Cracked fittings
- Damaged O-rings
- Leaks (ironically)
Mistake #4: Ignoring Pressure Requirements
Your nozzles are designed for specific pressure ranges:
- Low-pressure: 40-60 PSI
- Mid-pressure: 160-250 PSI
- High-pressure: 800-1200 PSI
Mismatched pressure = poor atomization or nozzle damage.
Maintenance After Installation
Your installation work doesn’t end when the mist starts flowing. Here’s how to keep things running smoothly:
Monthly:
- Visual inspection for leaks
- Check nozzle spray patterns
- Clean or replace clogged nozzles
Quarterly:
- Deep clean nozzles with vinegar solution
- Check and clean water filter
- Inspect tubing for UV damage
Annually:
- Replace worn O-rings
- Flush entire system
- Consider replacing heavily used nozzles
Troubleshooting Common Issues
Even with perfect installation, issues pop up. Here’s how to handle them:
Dripping nozzles: Usually means debris or worn O-rings. Remove, clean, and inspect.
Uneven mist: Check for:
- Clogged nozzles
- Pressure variations
- Incorrect nozzle sizes
No mist from specific nozzles:
- Remove and inspect for clogs
- Check fitting connection
- Verify water flow to that section
Advanced Installation Tips
Ready to take your installation to the next level?
Zone Control
Install ball valves to create cooling zones. This lets you mist only occupied areas, saving water and wear on nozzles.
Quick-Disconnect Fittings
Add these at strategic points for easy winterization or maintenance. Your future self will thank you.
Pressure Regulation
If your pressure varies, install a regulator near your pump. Consistent pressure = consistent performance.
Anti-Drip Devices
High-end systems use anti-drip valves that prevent that annoying drip when the system shuts off. Worth the extra cost for covered patios.
Wrapping Up
Installing misting nozzles doesn’t have to be complicated. With the right preparation and technique, you can create a professional-quality cooling system that transforms your outdoor space.
The key points to remember:
- Plan your layout carefully
- Don’t skip the flushing step
- Hand-tighten only
- Regular maintenance prevents problems
Whether you’re cooling a small patio or a large commercial space, these installation principles remain the same. Take your time, follow these steps, and you’ll have a misting system that performs flawlessly for years.
Now that you know exactly how to install misting nozzles, the only question left is: what are you waiting for? Your cool, comfortable outdoor oasis is just an installation away.